But before that, let’s explore more about Revit Formulas, Calculated Values in Schedules, and all the benefits of using them.
What are Revit Formulas and Calculated Values in Schedules?
You can use Revit Formulas to calculate values based on other data in the schedule. For example, you might use a calculated value to determine the total area of all the walls in a project or the total cost of a set of materials.
The Benefits of Using Calculated Values
There are several benefits to using calculated values in schedules. The most obvious is that it saves time and reduces errors. Rather than having to calculate values for each item in the schedule manually, you can set up a formula to do the work for you.
Another benefit of using calculated values is that it allows you to generate more meaningful data. By performing calculations on data within the schedule, you can analyze the project and make more motivated decisions. For example, you might use a calculated value to determine the percentage of a particular material used in the project or the total number of light fixtures needed for a space.
An important benefit is an option to save the schedule as a form with calculated values to reuse in the next projects.
Best Practices for Using Calculated Values
While the benefits of using calculated values in schedules are clear, there are some best practices to keep in mind to ensure that you use this feature effectively.
Plan ahead
Before setting up calculated values in a schedule, it’s important to plan out what data you want to calculate and how you want to present it. This will help ensure that your calculations are accurate and that your schedule is organized and easy to read.
Use clear naming conventions
When setting up calculated values, be sure to use clear and concise naming conventions. This will make it easier to understand what each value represents and help prevent confusion. It is also very important to keep an eye on the units and precision used in the formulas.
Test your Revit formulas
It’s always a good idea to test your formulas before finalizing a schedule. This will help ensure that your calculations are accurate and that there are no errors in your formulas.
Use comments
If you have a complex formula that is difficult to understand, consider adding comments to your schedule. This will help ensure that others can understand your calculations and make it easier to troubleshoot any issues that arise.
Update your Revit formulas as needed
If the data in your schedule changes, it’s important to update your formulas accordingly. This will help ensure that your calculations remain accurate and that your schedule is up-to-date.
Revit Formulas: Schedule of Values Example
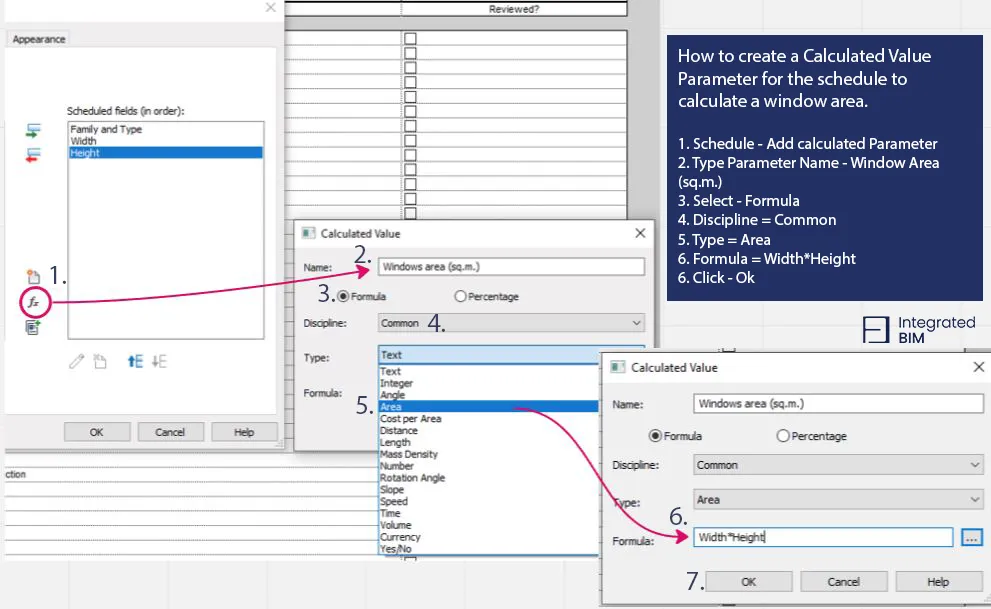
Let’s explore the step-by-step process of how to create a calculated value parameter for the schedule to calculate a window area.
- Schedule – Add calculated Parameter
- Type Parameter Name -Window Area (sq.m.)
- Select – Formula
- Discipline = Common
- Type = Area
- Formula = Width*Height
- Click – Ok
This should be the result after creating the parameters for the area

Another schedule of values example is how to create parameters for cost per sq.m. and VAT

In the end, we included 3 Calculated Parameters that are showing the area – Cost, Cost with VAT, and Totals. And these are the results shown in our window schedule:

If you’re finding it challenging to use Revit formula to calculate the values in your schedules or are looking for an easier way to implement this feature, consider reaching out to a team of BIM professionals. Contact us today.
Integrated BIM’s Consulting services provide you with a range of services that include not only consultation but also project management and implementation.
By working with a team of experts, you can ensure that your projects are completed efficiently while staying up-to-date with the latest best practices and technology. Book a consultation today to achieve your goals immediately.